

Whether you are hosting a dinner party or a family gathering, you want the food you present to look and taste delicious. Properly plated food simultaneously appeals to the senses of sight, smell, and taste, which is why the way your food looks is equally as important as how it tastes. For many aspiring home chefs, making the food taste delicious is the easy part. Plating and serving meals with garnishes and special touches so it also looks delicious is the area that proves to be most difficult. It is important to note that you do not have to be a professionally trained chef to plate your food at home like one. A common roadblock many aspiring home chefs face is a lack of confidence in their cooking skills. Properly plating your food so it looks like a top chef prepared it is easy if you know the tips and tricks. With a little know-how and a lot of experimenting, you will soon be presenting mouthwatering dishes worthy of the cover of Bon Appetit. Follow these five steps to give your meals the aesthetic boost they need.
1. Plan Ahead, Prepare and Organize
Dinner parties remain the most popular type of entertaining party in the U.S., with more than 12,000 online searches for dinner party meals monthly. There are many benefits of cooking at home, including the ability to use healthier ingredients, having more control over portions, and having the freedom to create whatever dishes you want. A recent survey on home cooking trends revealed that more than 34 percent of Americans aspired to cook more dinners at home. With most things in life, preparation is key to success — the same holds true for cooking and plating food for a dinner party. Preparing your recipe, kitchen tools and ingredients in advance and keeping a clear workspace will save you a lot of time and stress later. Remember to:
- Write Down Each Step: Preparing your meal in advance can be extremely enjoyable when you do it with your favorite music in the background, a relaxing beverage of choice or even a partner. It is helpful to write down every step required to create the meal, which may include everything from your tools and utensils to your ingredients. Be sure to list the ingredients in order, so as not to forget one. A handwritten list is typically best — following a recipe from your phone can be difficult, as reading small text and scrolling can easily cause you to miss a step.
- Have the Right Tools: Having the right kitchen tools is just as important as having the correct ingredients. This includes everything from pots, pans, bowls, and utensils to those essential items that are easy to forget, such as parchment paper and foil. Items like squeeze bottles for adding the perfect drizzle or decoration to your dish and long tweezers to arrange smaller and thinner foods are a must-have for any home chef. Other helpful tools include paintbrushes, tools that julienne or create spirals, ladles, tongs, and clean kitchen towels. Make sure your tools are in working order and your knives are properly sharpened.
- Prepare as Much as You Can in Advance: It is essential to make sure all your ingredients are fresh, but you should still prepare as much as you can in advance without sacrificing the freshness and quality of your ingredients. Certain items, such as avocados and greens, will brown or wilt if cut too long before eating. Cut, peel and trim as many components as you can and put them into bowls or containers. You can also prepare sauces and marinades, then store them in squeeze bottles. You can place some ingredients in pots with lids, ready to be put on the stove. Keep the final product in mind as you prepare each element to be sure they will look good in the finished dish.
- Organize Your Workspace: Having an organized workspace improves your workflow. This includes arranging your ingredients in your refrigerator and laying your tools out on the counter in the order in which you will use them. While it may not seem worth it to clean up until after the whole meal is prepared, it is. Washing and putting away items as soon as you are done with them allows you to keep both your kitchen and your mind clear. You may need the space or a particular kitchen tool for a later part of the recipe. Too many meals have been ruined by the chef having to hastily wash a needed kitchen tool, clear off a usable space in the kitchen or rush to clear a sink full of dishes to empty a boiling pot. Keeping your workspace clean allows you to focus on the meal, enjoy your guests and have less cleanup later.


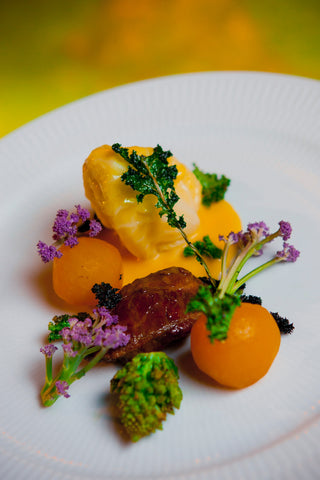
2. Experiment with Color and Texture
Mixing and matching the colors and textures of your food adds to its appearance and flavor. Consider using complementary colors for both your ingredients and table décor. Mixing up the textures and colors of the placemats and napkins you use can also complement your food. For example, when serving a dish with a lot of green, consider pairing it with something red, or even serving it next to red napkins. A dinner party is also the perfect opportunity to present interesting flatware and cloth napkins with bold colors and textures. Brightly colored foods are pleasing to the eye. Choose dishes with ingredients that look nice together and try to avoid foods with the same color scheme. Including bright vegetables in your recipes can add a pop of color to an otherwise dull dish. Today, many vegetables such as potatoes, carrots and cauliflower are even available in a variety of bold colors. The way you prepare your ingredients also affects their color and makes them look more interesting when plated. Here are some standard cooking techniques and their effect on food's appearance:- Boiling and Steaming: The color of vegetables is greatly enhanced when lightly cooked. Steaming or quickly boiling your vegetables brings out their vivid colors and ensures they will be perfectly cooked rather than mushy and bland.
- Roasting: Roasting adds warm, vibrant color and delicious flavor to foods such as potatoes, onions, cauliflower, and carrots.
- Searing: Meats and fish benefit from being seared, as this creates a delicious, crispy brown outer layer that looks great when plated.
- Frying: When correctly executed, frying foods can give them a warm, golden color and add to their texture. However, undercooked, or overcooked fried foods, along with those that are not sufficiently drained, can look greasy and unappetizing. For both searing and frying, it is vital to use a quality oil suitable for cooking with high heat.
Foods with bland colors can be made to look more exciting and tastier with the addition of bright, interesting garnishes. For smooth foods, consider garnishing with something that adds texture. Garnishes should always be edible and add to the flavor of the dish. Edible flowers, citrus zest or wedges, infused oil, chopped herbs, cream or sauce and even whole spices are commonly used garnishes. Fresh herbs and infused oils not only add a touch of texture to your dish, but they also enhance the aroma. Be sure to garnish lightly to keep your plate from looking cluttered. Every aspiring home chef should equip their kitchen with an assortment of high-quality artisan oils. These oils come in many delicious flavors and can be used on their own or as a base for marinades, sauces, and vinaigrettes. Oils infused with garlic, pesto, basil, and other herbs make a tasty dipping sauce and can also be used on their own for an appetizing drizzle of flavor. They add flavor, color and texture and are also suitable for a variety of cooking methods you may use. You could compare them to an artist's palette, as the opportunity to experiment with them is almost limitless. Artisan oils can add an entirely new layer of flavors to your dish with just a drizzle. Interested in getting the latest special offers, newsletters and recipes? Sign up for our Artisan Oil Club!


3. Choose the Perfect Plates
The plates you choose to serve your food on are just as important as the food itself. Consider yourself an artist, with the blank plate as your canvas and your ingredients as your medium. Most chefs prefer to use white plates, which allow the color and texture of food to stand out. Ivory or light-colored dishes are also perfectly fine to use. However, plates with bold colors or patterns can take away from the food's detail and visual interest. As you get more comfortable with plating, though, you can begin to experiment with different types of plates, as dark-colored plates can sometimes create a striking contrast to your food. The size and shape of your plates are also critical. Dishes should be appropriately sized, so your portions do not look tiny, and each ingredient or food item stands out. You want to cover most of the space on the plate while also allowing some white space to remain. You can imagine the rim of the plate as a frame inside which you will arrange your food. You also want to be sure your plates are shaped appropriately. When finishing a dish with a liquid such as sauce or broth, your plate or bowl must have enough room, so it does not spill over. When serving cold or frozen items, your plates should be cold, too. Achieve this by placing your dishes in the refrigerator or freezer for at least an hour before plating. Plate temperature affects both the appearance and flavor of your food. For example, if placed on a warm plate, your perfectly peaked whipped cream will melt before it reaches the table. Conversely, when serving hot food, your dishes should be hot. Before plating, keep your dishware in a warm oven — if the plates are oven safe — or on top of a toaster oven or hot cooktop.


4. Experiment with Layers and Height
The ideas for creatively plating food are endless. Having about three different heights when plating your food helps fill up the space on the plate and makes food look bigger without increasing the portions. Experimenting with three-component meals containing protein, starch and vegetable is an easy way to start and offers many opportunities to experiment with layers and height. The ideal forkful is one that combines all the flavors of the dish in one bite. Proteins on top of starches are a popular layering method — think steak over mashed potatoes or sliced chicken on top of rice. Always keep the three essential layers in mind as you plate:

- Bottom Layer: Like the foundation of a house, the bottom layer of your dish usually helps the other layers stay together. Puree, mayo, sauce, or oil can be used as a base to hold the next layer in place. With liquid components, you may need to build up the foundation with other ingredients. The bottom layer can also add texture and color. Think — a dollop of puree spread across the plate with the back of a spoon, a leaf of lettuce or other greens or a few dots of different oils strategically placed around your plate. Food can also be spread out or fanned across the plate to create a low layer.
- Middle Layer: The middle layer of your dish is the bridge to both your top and bottom layers. To create a central layer on your plate, piles, or little piles of food such as rice, pasta or potatoes typically work best. Place noodles in a neat, round pile or mold rice into a mound. The middle layer of your dish may also contain your protein. Keep in mind that a little bit of the layer below should show through each succeeding layer.
- Top Layer: The top layer of your dish may consist of your protein or longer items like asparagus spears or potato wedges. You can stack your food items on top of each other or lean them against the middle layer. Lighter items work best for being stacked or leaned. Creating height adds excitement and dimension to your dishes, just be sure you do not make it too high, or guests may be intimidated and not know where or how to begin.
Each plate should not look perfect, as asymmetry looks more natural and aesthetically pleasing. When plating foods such as shrimp, sliced meat or appetizers, odd numbers give the perception of having more food on the plate. Combine round foods with straight foods as much as possible and let the food land naturally on the plate when sprinkling and garnishing. It is perfectly alright if each guest's plate looks slightly different at your dinner party.
5. Choose Your Plating Method
There are many techniques you can use when plating food. Take examples from fine restaurants and food trends — each method involves the different placement of food on the plate and provides the opportunity to experiment and have fun. For direction on food placement and artistic touches, follow one of the three primary plating methods:
- Classic Plating: Classic plating, also known as the clock method of food plating, is a good way for aspiring home chefs to start. This method not only helps you arrange your food in an appetizing way, but it also teaches you to portion correctly. From the diner's point of view, carbohydrates such as pasta, rice, potatoes, and bread should be placed at the 11 o'clock position of the plate, vegetables should be placed at the 2 o'clock position and protein should be placed at the 6 o'clock position. When considering portions, the protein should occupy about one half of the plate, while the starch and vegetables should each cover about one-fourth of the plate.
- Free Form Plating: This type of plating takes inspiration from paintings and artwork. Each food item is placed artistically on the plate to mimic an abstract work of art. Elements commonly seen in free form plating include strategically placed portions of starches and proteins, artistically crafted garnishes in spirals and other shapes and uniquely sized and shaped dots of sauces, purees, and oils.
- Landscape Plating: This method of plating takes its name from the arrangement of landscaped gardens. It consists of long and low placement of food across the plate. Commonly seen elements of this method include streaks and drizzles of purees and sauces, small piles of proteins and starches and spiraled or julienned garnishes, whole leaves, fruits and vegetables like peas and berries.
6. Use the Right Tools for Food Plating
To get the look that you imagine, you need to use the right tools. Just as you need the proper utensils to cook your meal, using the right tools during plating makes a huge difference. You carefully prepare your food for perfection, and you need plating tools that match your attention to detail. While some chefs like to get creative and use atypical tools, these are some of the plating basics that anyone serious about creating beautiful plating needs:

- Tweezers and Tongs: When you're working with very small pieces of food, like rice, chopped vegetables and other ingredients, you need precise tools to make small adjustments. If food doesn't quite lay right, you can make the adjustments you need to get the particular look that you have in mind. For tiny foods, use tweezers to put them onto the plate in the exact placement that you want.
- Precision Spoons: If you're adding sauces or other types of liquid food to a plate, you want to place it precisely and in the right amount. With precision spoons, you can do just that. These spoons have a unique design where they have a much deeper well, and some have a small spout on either side of the spoon's bowl. This gives you more control when pouring compared to other spoons.
- Graters: Having a variety of graters of different sizes helps add beautiful, colorful and delicious garnish to your dishes. Finely grate some veggies, like carrots or radishes, for a pop of color. With a variety of different graters, you can add different textures to your plating depending on the size of the grater's holes.
- Squeeze Bottles: If you're still learning the basics of plating techniques, you may not think of a squeeze bottle as a professional or gourmet level tool. But it can give you even more control than a precision spoon. With a squeeze bottle, you can use sauces and other liquids to create designs on the plate itself or even on the food. Swirls, dots, and other patterns can give a plate a unique, beautiful appearance.
- Decorating Brushes: With a variety of brushes, like those made with soft synthetic or silicone bristles, you can make precise lines on plates ot even paint a cake. A set of brushes makes you feel like a real artist during the plating process. From fine tip to wide, thick brushes, these unique tools will help you create texture and other small details on the plate.
- Molds: When you visit a high-class restaurant, you may be served a plate with the food in precise shapes. To shape food in your own kitchen, use a mold. You'll find molds shaped like squares, circles, ovals, hearts and more. If you want a one-of-a-kind look, order, or make a custom mold for yourself.
- Wedge Plating Tools: Use these tools with sauces and other liquid-based foods, like purees. The base of these tools can be straight or have notches in a variety of different shapes to create patterns on your plate.
7. Consider How to Change the Color of Food
Even someone who is just learning the basics of cooking notices that different foods change colors during the cooking process. From cooking meats to safe and preferred doneness to understanding how other ingredients change color during various cooking processes, you'll be more prepared to create appealing and creative plating. Knowing how to change the color of food through different cooking methods helps a lot during plating. If you're unaware of these changes, your plated food may not look the way you imagined. The following are cooking methods that affect the color of food:
- Lightly cook vegetables: Overcooking vegetables doesn't just affect the texture — it changes the color too. Steaming or blanching (cooking and then immediately dunking veggies in an ice bath) will keep vegetables from overcooking and also keep them looking their best. The bright orange of a carrot, the deep green of asparagus and other vegetables shine and are even enhanced when you avoid overcooking.
- Roast your vegetables: Roasting to achieve a caramelized texture on vegetables can give an attractive golden hue. Cauliflower, potatoes, and onions are a few veggies that look great after roasting and taste incredible too.
- Sear proteins: When it comes to meat and fish, searing is the best way to go! The crispy texture and brown, slightly charred exterior create a look that many diners salivate for. It also helps trap in flavor and juices, making for an even tastier dish.
- Fry your foods: Frying foods also achieves a nice golden tone while providing different textures. When you're frying, be careful not to under or over fry the food. A coating that's too pale or too dark won't give the plate the same look as a perfect, golden-brown fry.
Quick Tips for Professional Food Plating
As you follow these steps, there are several tips you should keep in mind. Try doing these things before your next dinner party when you are not worried about cooking on schedule or how the final product will turn out. True experimentation can only happen when the chef is relaxed and has sufficient time to let their imagination run wild. Some tips include:

- Create a visual picture of all your meal components, including the main dish, sides and garnishes and imagine how you will place them on the plate. Remember that asymmetry is best for creating the most natural looking and mouth-watering recipes. Imagine how you will set each component to make it the most interesting.
- As a start, place your main food item in the center of the plate and add the other foods around it. Be sure to leave some white space on the plate to prevent it from looking crowded.
- Experiment with all your food components until you find a pleasing balance of colors, textures, heights, and flavors.
- Add garnishes like drizzles, swirls or dollops of sauces, oils, or condiments.
- Use your clean kitchen towel to wipe around the edge of your plate for a neat presentation.
Always season your dish immediately before serving, as it helps the food retain its freshness and flavor. Ingredients like oil or salt can cause food to cook, melt or congeal if added too soon. If your food starts to dry out before serving, give it a spritz of oil or water. In dishes containing broth or sauce, be sure to add the liquid to the other ingredients right before serving. You may find it helpful to use a recipe with a picture of the finished dish you can use as a reference. As time goes on, you will gain more confidence and begin to use your acquired skills and imagination to create your own plating masterpieces.